Donut Masks and Collimation of SCTs
So you have been reading all about how important it is to collimate that SCT in order for it to perform at its best. What? You have not? OK, check this out before going further. Unfortunately the real world is not quite the same as the simulated views on Thierry Legault's page. When you are at your SCT and using a magnification of 300x to 600x you find that the seeing is such that everything is jumping around, very, very fast. Where are the diffraction rings? Rings? the star is not even round! It just squashes this way or that with spikes in all directions. The larger the SCT, the rarer it is to get any semblance of disc or rings. But then all your friends who own refractors tell you that they have no problem seeing diffraction rings. Well, it's because the typical aperture on a refractor is so small compared to the typical aperture of an SCT. The larger the aperture, the more seeing manifests itself. On a large SCT the air column on the left edge may be behaving quite differently from that on the right edge, or anywhere else for that matter; hence the squishy-squashy star shapes. OK, you have collimated your SCT as best you can, but you are still unsure as to whether you can do just that little bit better. That's what this page is all about, the final tweaking under adverse seeing conditions.
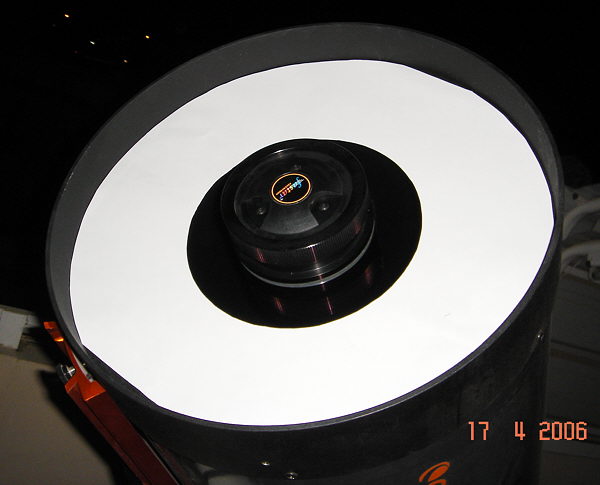
Let us first try to get you to see clear diffraction rings through that SCT. Hint: small apertures, steadier views. So, cut yourself a donut mask that reduces the diameter of your SCT's aperture to about 60%. Let's say you have a 14" SCT. Use a pair of compasses, a pair of scissors, and cut yourself a donut like this:
I used ordinary white paper, the outer circle was 15" diameter so that it fits snugly into the OTA and the inner circle was 7.5", or 60% of the 14" aperture of the C14. Make sure that the outer diameter is a snug fit, otherwise you are going to have problems centering the mask. And do try to cut the inner circle as accurately as you can. You do not want to introduce yet more patterns into your diffraction rings. The sizes you use are not overly important. The smaller the inner circle, the steadier the diffraction pattern (good, and seeing related of course), but also the larger the image you get for the central diffraction disc (bad, destroys sensitivity to collimation). I suggest you start off with between 50% and 70% of your aperture. Seems to work well for visual use. Now you have plenty of bright, reasonably steady rings to take your collimation to the next level of accuracy. You may even be lucky enough that you get it to a level that you can then use the full aperture at focus :-) The larger the SCT, the more elusive this is, but sometimes the air gets steady enough to see at-focus rings through a C8.
Ummm. So you do not have gorilla-sized arms to twiddle the collimation screws and view the diffraction rings simultaneously. Use a webcam! Here's the set up I used:
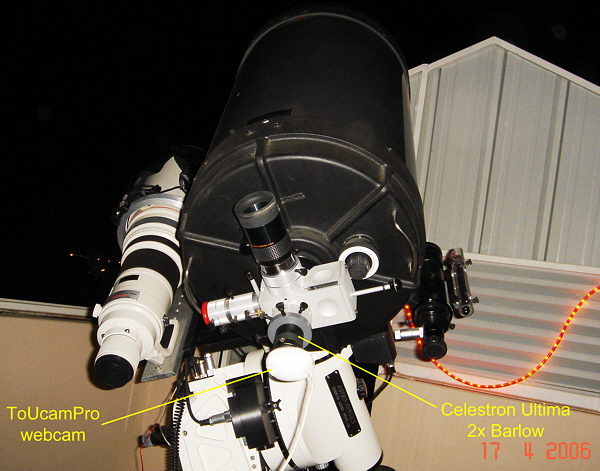
With the addition to the back focus from the Van Slyke Slider I end up with a focal length of about 10,000mm. And here is the donut to get easy-to-evaluate webcam images (as you work precariously up a step ladder or a chair, twiddling those collimation screws):
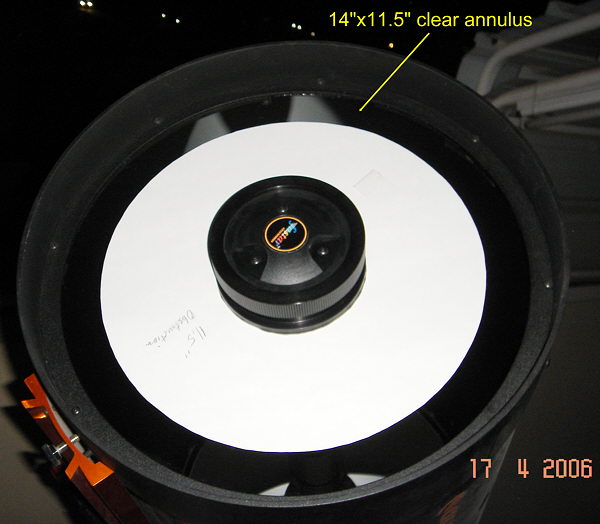
You note that this donut is different from the previous one which was chasing reasonably steady diffraction rings. For the webcam we are chasing a very bright diffraction ring and a central spot/disc that can be easily seen from your precarious perch, despite everything dancing around like crazy. For the above donut I used an inner circle that was 4.5" diameter and an outer one that was 11.5". The inner one fits perfectly onto the secondary housing, avoiding all worries as regards centering it. Hint: stick a piece of folded-over cello tape onto the mask so that you can lift it off without scratching that corrector plate, or putting finger prints on it. Here are the results with the mask on the left and full aperture on the right, first pair slightly defocused, but with no focus shift between the two:
Next pair in-focus, again, with mask on the left, full aperture on the right:
A few notes. The videos were shot at 30 fps and do show the very fast variations in seeing. What is displayed above are 2-second loops using only one frame in every six. The frames were then cropped to show areas that are 30x30 arc-seconds and then reduced by a factor 0.5x, all aimed at reducing file sizes. So, there you are on your precarious perch, the videos that you see on your laptop are 2x larger than shown above. Consequently it's fairly easy to get that central spot in the middle when the mask is used with a slight defocus. You can approach focus quite a lot closer than you can with the full aperture. When you are fully in-focus there just isn't much to collimate with, mask or no mask. You may, of course keep on dreaming of a night with seeing so steady that the diffraction rings show up. With a large SCT you'll end up waiting a long, long time. Just use a donut mask with the seeing you have :-) Last hint: before fiddling with those collimation screws make sure that you are fiddling the correct one out of the three. Put your hand to block a portion of the masked annulus and you should see its shadow straightaway on the defocused ring on the monitor. Now you can choose the correct screw to shift that center spot in the direction you want.
For more stuff return to Samir's Home
To drop me an e-mail just
click on:
samirkharusi