Imaging Mars
Challenges in Planetary Photography
(Focusing, turbulence, diffraction limits)
Mars came closer to Earth in August 2003 than it has for some 60,000 years. Despite all the news hype, it was not all that close! It still remained a very tiny disc, 25.1 arc-seconds diameter at its closest, around 27th August. Anyway I joined the hundreds of amateur astronomers who tried to photograph it. Actually, the photos through a telescope tend to show far more detail than trying to look at it visually through the same telescope. This is basically because Mars has very little contrast between its highlands and lowlands, with the most prominent feature visually being the bright white South Polar Cap. Over the years I had tried to image Mars on film (very frustrating because of the low contrast and longish exposures), with a digital SLR camera (more rewarding since you can use a higher ISO and you do get quick feedback if you shoot tethered to a PC) and with my latest, a $100 webcam (easiest and most rewarding!). In between I had tried out a chilled astronomical CCD, SBIG 237, on Jupiter and Saturn. The SBIG 237, like the majority of the chilled CCDs, requires an RGB filter wheel to get colour photos. This means that you need a good set of images in each of the three primary colours, all taken within a few minutes, before the planet has had time to rotate significantly. Difficult.
Challenges in planetary photography may be summarized as follows:
Magnification: Get set up with your telescope at a high enough magnification so that you can eke out all the detail that the scope can possibly deliver. Visually one might compare it to viewing the planet at 300x magnification, or even more. Everything shakes and trembles constantly. No breathing allowed if you even dare touch the telescope's focus knob! If you are using an SLR camera you have to use mirror pre-release so that the mirror slap does not shake your images into uselessness. On many, though not all SLRs, the opening of the shutter, well after mirror pre-release, gives sufficient shutter shudder that again the photos are far too shaky. My earlier attempts on film SLRs had to be done using the hat-trick method, thus avoiding shutter shudder altogether. Takes a few rolls of film to sort all that out ;-) Of course it goes without saying that you need a good tracking mount that follows the planet. At these high magnifications there's no way to use a fixed tripod. One would spend all night just chasing the planet to keep it in view. In brief, to be certain that you capture all the diffraction-limited detail that your scope can possibly deliver, it's often recommended that you get set up at the Nyquist criterion for digital capture (Nyquist: 2 pixels per Full Width at Half Max of your diffraction disc), or a bit more. In theory Nyquist should be enough, but since the planets are actually quite bright, it may be better to go for a little bit of over-kill, over-sampling rather than under-sampling; so anything from Nyquist to 1.5x Nyquist should be fine. Simple, useful rule-of-thumb: if the pixel width of your imaging sensor is w microns, then configure your scope to f(4w), or even a bit higher, say, up to f(6w). Eg. if your webcam has 5 micron-wide pixels then configure your scope to f20. But up to f30 should still be satisfactory. If your DSLR has 7.5 micron-wide pixels (Canon D60, 10D, 300D) then get set up at between f30 and f45. That should be ample magnification to coax out all the diffraction-limited detail that your scope is capable of. More magnification simply leads to needlessly longer exposures (4x longer if the f-no. is doubled!), though often easier focusing. We are of course often limited in our choices by the gadgetry we already own. Compromises, compromises.
Focusing: Next, one has to achieve good focus. Since you do not "stop down" a telescope (you need all the aperture inches you can muster in order to get maximum resolution), focus has to be dead on, period. Nil depth of field. With low magnification all you see is a tiny, tiny disc in your SLR viewfinder. Not much use for focusing. So you reconfigure the telescope to achieve higher magnification, i.e. use a longer focal length, often much more than the minimum required (Nyquist). At enough magnification and a good viewfinder you may now see a glimmer of surface detail, and thus be reasonably sure of good focus. But at such high magnifications the view is now very dim, necessitating longer exposures. Ideally one would like a video output to verify focus as you twiddle the focus knob (while holding your breath!). This is where the astro CCDs and webcams excel. You get to see a live or an almost-live view on your PC monitor all the time, which in turn enables you to use lower magnification, leading to shorter exposures. A Digital SLR tethered to a PC allows you to check focus within a minute, not live, but far better than with film, where you have to wait until your film is processed. Gadgets such as Hartman masks, etc are simply not sensitive enough for the focusing accuracy required. Webcams, and also some astro CCDs, use electronic, not mechanical shutters, hence no shutter shudder either :-) You thus start realizing that fancy DSLRs are not really the answer for planetary photography. A cheap webcam may well do a far better job, with less effort.
Air Turbulence (Seeing): Not much you can do about it. It's always there, sometimes more, sometimes less. Typically, turbulence is estimated at around one arc-second on a nice, reasonably steady night. That's already one twenty-fifth of the largest diameter Mars has had in the last 60,000 years! A clear, transparent sky is not necessarily a good indicator of planetary seeing conditions. The seeing can sometimes be exceptionally steady on hazy, humid nights. The shorter your exposures, the more you avoid the turbulence. This is where film really loses out. Even with modern day fast films exposures required tend to be in excess of half a second. For Saturn you run into a couple of seconds. To image the moons around other planets the exposures get even longer. The professional astronomers are working hard to come up with adaptive optics (basically electronically controlled flexible mirrors) that would largely cancel out the air turbulence. Still early days, and so far only feasible at (the longer) infrared wavelengths. But of course the Hubble Space Telescope has no air to contend with at all. Nil turbulence.
Diffraction Limits: The larger the telescope's aperture, the finer the diffraction limit and hence the higher its resolution. However, when a telescope gets larger than about 20 inches in diameter, the cylinder of air that it is looking through is also larger and thus has to contend with far more turbulence than a smaller telescope. The large scope is then limited in its detail-resolving abilities by the seeing conditions, rather than by its diffraction limit. So it becomes a balancing act between aperture inches for a finer diffraction limit against the increased turbulence affecting the images. Best compromise seems to be telescopes having apertures of around 14 to 16 inches; still amateur (though higher-end) territory. The Hubble Space Telescope (HST) can, of course, fully exploit the exquisite resolution of its 2.4m diameter mirror. The existing giant, Earth-bound telescopes with 8 or 10-meter diameter mirrors are aimed at gathering lots of light from the very faint, very distant stuff, not planetary photography. The hope of course is that adaptive optics will soon become practical enough for them to be useful for routine planetary studies.
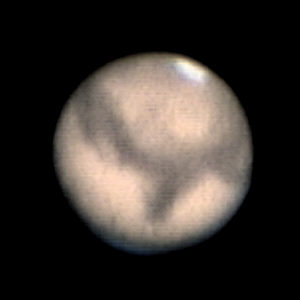
Now let's see how it all adds up. Here's a 5-frame loop of a 2-second webcam capture, cropped at 1:1 from the 640x480 pixel originals. Actually I recorded the video at 5 fps and I just took a random 2-second section, but dropped every other frame, to save on web bandwidth. Capture Data: Celestron Ultima 2000-8" Schmidt Cassegrain Telescope @ f20 (Ultima 2x Barlow) on my roof at Azaiba, Muscat, 20:22 on 27th August 2003 UT, Philips ToUcam Pro webcam, 5 fps, exposure 1/33sec per 640x480 pixel frame:
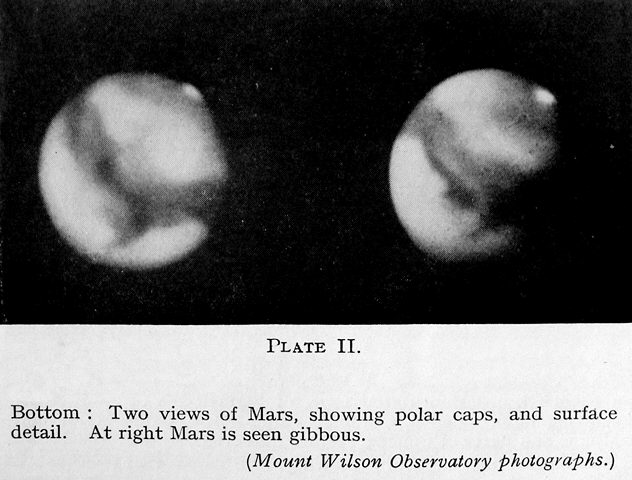
We can simulate what a good 2-second exposure on film should look like by simply stacking up the above five frames, without trying to re-align them, followed by digital processing to improve contrast and sharpness. Actually, my digital processing is done at 200% magnification, i.e. resize all the frames to 200% to eke out all possible detail that they may contain. Consequently all my images below are at twice the initial capture size (as in the animated gif above). Compare my simple colour composite of 5 frames covering 2 seconds to what were possibly cutting-edge-technology photos of Mars from the 1950s; and you realize that, even though they did have excellent, large telescopes in those days, film just is not the medium of choice for planetary photography. The long exposures required by their slow films, possibly more than a couple of seconds, simply integrated all the air turbulence blur, despite their superb optics. The Mount Wilson photos are reproduced from the book, "Teach Yourself Astronomy", published in 1952:
So, for the professionals, especially in the olden days of film, air turbulence is the major headache, and without fancy adaptive optics (currently still in infancy) they cannot hope to do much better than mere amateurs. Obvious solution, launch the scope into space! For smaller amateur telescopes (<14") diffraction limits also enter the scene. So how bad is diffraction, really? To simulate the diffraction limit of an 8-inch SCT I took the closest/best ever HST Mars photo (taken many hours before mine) and shrunk it down so that each pixel is at Nyquist for 0.7 arc-seconds. That last is the theoretical diffraction limit of my 8" SCT, including allowance for the central obstruction (loss of contrast) caused by the secondary mirror. An unobstructed 8" refractor should resolve a bit better, just under 0.6 arc-seconds. The HST has a 2.4 meter diameter mirror and thus a diffraction limit that is 12 times finer. And nil air turbulence. Here is the HST photo shrunk down to Nyquist for 0.7 arc-seconds diffraction limit, i.e. 0.35 arc-seconds per pixel:

I then enlarged it (resized in an image editor with all the fancy interpolation to smooth out the pixilation) to equal mine. The right image below should show what my 8"SCT could capture if it were in space, limited only by diffraction, with nil air turbulence:
Downsized HST
image =>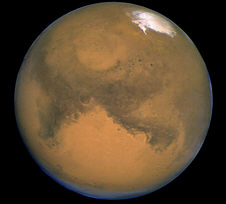 @
8"SCT diffraction limit =>
@
8"SCT diffraction limit =>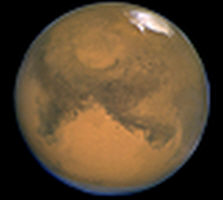
and this is what I did capture from my roof, notwithstanding the cloudy, hot weather:
2x
magnified version =>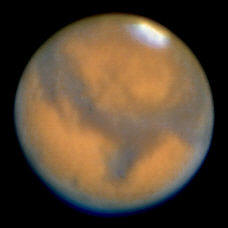 and
shrunk back to original capture size =>
and
shrunk back to original capture size =>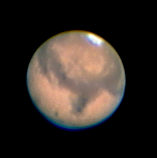
Note the planet's rotation between the HST photo and mine. Compare mine to the upper-right in-space diffraction-limited simulation. Basically that's the best one can ever hope for with an 8" SCT, used in outer space! I am not particularly keen on the very saturated colours used by NASA, but I had adjusted my above left image to match theirs. The smaller version would be more to my taste, no colour manipulation, just white-balancing the South Polar Cap and a small increase in saturation. Your pick. Now compare this humble 2003 amateur digital image with the earlier discussed Mount Wilson photos from the 1950s. Did Mars' topography change in the last 50 years? If only the Mount Wilson photos were a bit sharper... ;-)
For fellow webcam users, my procedure was as follows. The webcam was used to shoot bursts of 200 frames at 5 frames per second (i.e. 40-second video clips). Focus was readjusted between bursts, always hoping for something better. The best looking clip was chosen by video replay. This best-looking 200-frame burst was then converted to bmp, frames sorted by quality, and the best 30% were aligned and stacked at 2x magnification. All in K3CCD software. Sharpening, colour balance and contrast were then adjusted in Picture Window Pro.
I also wished to image the other "face" of Mars, but since the rotation rate of Mars is fairly close to that of Earth (24.6 hours vs. 24), when you come back and look at it the following night you find that it has rotated only a little bit. So, I came back many days later, but by then Mars had receded away from us by quite a bit and the planet's image had shrunk noticeably. I also wanted to show how much it rotates over several hours. However there are severe limitations as to how many hours you can cover in one night. The best seeing is when Mars is crossing the local meridian, i.e. closest to the local zenith. Any deviation from that and the atmospheric seeing gets worse very quickly. Anyway, here's what I managed to capture over a 4-hour period, two hours on either side of Mars at our local meridian, on 17th September 2003:
Both images below show Mars while crossing our local meridian. Compare:
17th
September =>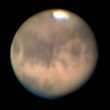 27th
August =>
27th
August =>
You can read more about diffraction limits, pixel sizes and magnification, together with real example images of the planet Saturn captured using different scope configurations (f20 and f50) here.
For other stuff, astro and normal photography, click Samir's Home