A Review of the Kenko Skymemo
as an ultra-portable DSLR astro tracking mount
Introduction
Many of us have to travel to dark sites in order to achieve satisfying results in our long-exposure DSO imaging. By the time one has added autoguiding and a laptop, and the consequent heavy batteries needed to keep everything ticking nicely all night, one is indeed encumbered with a lot of luggage! So we dream of some magical equipment that is both light and precise enough to deliver competent DSO images. The market offers a number of light tracking mounts, but the cheaper ones tend to be wobbly, on wobbly tripods; and thus are limited to very short focal lengths, barn-door tracker territory. My search for a high quality German Equatorial Mount that is also ultra portable led me to the Kenko Skymemo. It is not particularly cheap, but it is certainly light. It is capable of carrying up to 5 kg, sufficient for a DSLR with medium telephoto lenses. So here below let me share my review of this fairly uncommon mount.
The Skymemo was designed as a precision tracking mount for wide-field imaging using film, even with two SLRs simultaneously. I purchased the mount with the intention of using it with a DSLR. Since a DSLR is generally capable of larger end prints than grainy, fast film, we are in fact imposing conditions on the mount rather different from what it was originally designed for. The tracking has to be more precise, pixel-perfect, but for very much shorter exposures. My intent was to use this mount strictly for portable imaging, out in the boonies at some far off dark site, or even in foreign lands. Portable DSO-imaging often implies carrying along heavy truck or marine batteries (I have to take three!), a laptop computer, an autoguider, a guide scope, and... All these are not exactly conducive to air travel to some dark site on the other side of the world! In theory the Skymemo can be guided, certainly manually, and perhaps, with enough imagination and perseverance, even autoguided. I had no interest in doing either. What I was looking for was astro-imaging with no heavy batteries, no laptop, no guiding, no drift aligning and at focal lengths long enough to suit a reasonable variety of targets; all in a package small and light enough that I would be quite happy to take along on a long trip, by air or by road. Actually, it turns out that the Skymemo does very well in fulfilling all these demands.
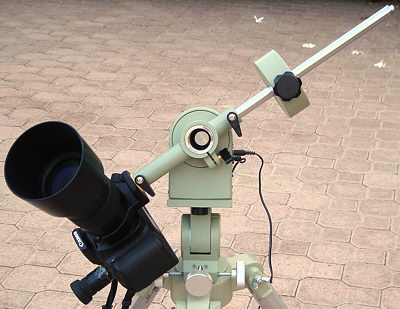
Base Skymemo
The mount head is very compact and looks like a precision job, well thought through and executed, no rough finishing anywhere.
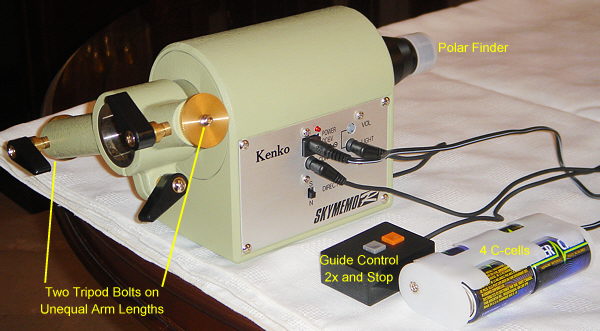
A Polar Finder Scope is included, pre-adjusted, together with a means for manual guiding; basically 2 buttons, one to double up on sidereal rate, the other to stop the drive. Controls are very simple, choice of Northern or Southern hemisphere and a "Volume" control to adjust the brightness of the illumination of the reticle in the Polar Finder. To switch "On" all you need do is plug in the 4 C-cells. Two cameras may be mounted simultaneously, the heavier one on the short arm and the lighter one on the longer arm. One may also add a ball&socket head on the shorter arm to allow greater freedom in pointing the camera(s). With the high prices of DSLRs it is less likely that there will be much demand for tandem camera usage. It probably made excellent sense with film cameras. The brass ring holding the tripod screw is sort of a wedge-in, rotates a full 360 degrees to any Dec desired and can be locked immediately and very firmly by the little black lever next to it. In theory the Skymemo may be mounted on any robust and rigid photo tripod that will allow polar alignment; basically a tripod with a pan&tilt video head. I doubt the practicality of using a ball head for precise polar alignment. It should be noted that most photo tripods are not rigid enough for long focal length astrophotography and most video tripod heads have too much sag for precise polar alignment. Nevertheless if you already own a pro quality tripod and a video head meant for use with heavy telephoto lenses then it could well be a practical proposition to use them. Or you might look for a geared head. I opted for the Kenko dedicated tripod.
Dedicated Compact Tripod
This is a short mini-tripod. Excellent for air travel and stability/rigidity. Uncomfortable for polar aligning, pointing the camera(s) and reviewing the captured images on a back-of-camera LCD. You have to sit or squirm on the ground. Bring along a soft mat or towel for the squirming. Photo shows the tripod fully extended. It is short.
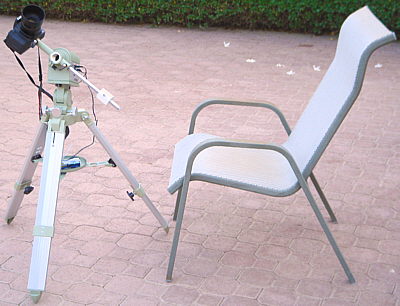
It does have excellent, buttery-smooth adjustment screws to get the polar alignment dead right; a well executed essential.
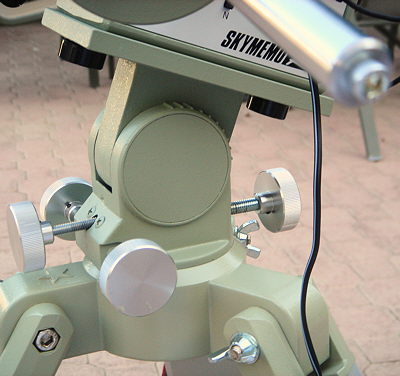
Now, if only one could take that entire, beautifully made polar alignment alt-az head and screw it onto one's favorite photo tripod... Not so straightforward since it does not have a simple flat bottom and it sort of drops into a toothed cup. With some imagination I expect it should be possible to make a custom base that can then be attached to a standard set of, say, carbon fiber tripod legs, the $600+ type. But my photo tripod is nowhere near rigid enough for DSO imaging, so I will live with the squirming. An alternative could be to make a set of long legs (wood?) for car trips into the boonies and retain the standard short legs for air travel.
Counterweight System
If you wish to use only one camera at a time, like yours truly, then you need to purchase the counterweight bar and a small counterweight. The smallest offered is 1.5 kg and unfortunately it is actually too large and too heavy for most set-ups with the smaller DSLRs. Its diameter is such that much of the time it clashes with various parts of the mount or tripod when you want to do a meridian flip. This implies that you have to move stuff up or down to execute a flip. It also generally reduces the RA arc available for imaging. There is a modicum of extra flexibility available by exchanging the camera and counterweight bar on the shorter/longer arms. Consequently I found it expedient to have a smaller counterweight made, about 0.5 kg, with a smaller diameter, for use with the shorter focal length lenses, the white one in the picture below:
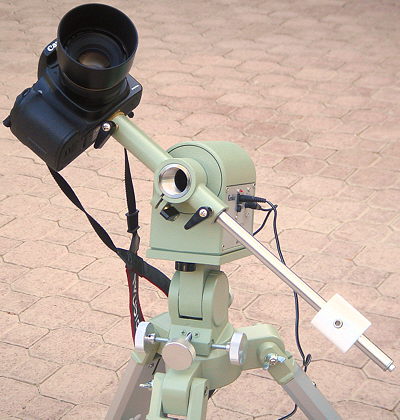
Prior to receiving the counterweight (was out of stock) I used a small, self-clamping wrench on the bar. Worked very well. The stock 1.5 kg works satisfactorily with larger lenses, shown below balancing a Canon EF 200mm/2.8L II on a 20D:

Note that the larger lens is mounted by its tripod foot on the ring collar of the lens. Apart from the obviously better load balancing, the ring collar also serves as a quick release in case you have to demount the lens, e.g. for re-auto-focusing on a bright star without losing your carefully attained framing. It also enables you to reframe easily with North up, left, or right. The Skymemo is particularly nice in the sense that you are not forced to do a meridian flip as your target crosses the meridian. In fact you can easily do several hours' imaging in one run, e.g. starting when the target is well to the East of the meridian (in picture below) and continuing to the extreme West.
And in Actual Field Use?
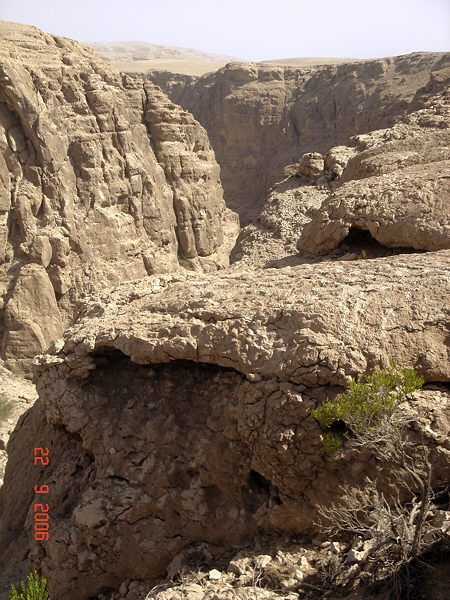
Took the Skymemo, Hutech 20D, bunch of lenses and 3 camera batteries and drove off to the Shab Tombs in the Sharqiya region of Oman, roughly half way between the town of Ibra and the coast. Just as an interesting aside: the Shab Tombs are reputed to be about 4500 years old, pre Bronze Age, and there are some fifty of them scattered around these now barren mountain tops. There are hardly any villages at all nearby, not even foraging donkeys or goats, perhaps an attestation as to how old the tombs must be. Some kind of settled civilization must have built them, at a time when the mountains were fertile enough to support it. Here is a Google Satellite View of the area, the arrow showing where the Skymemo did its thing:
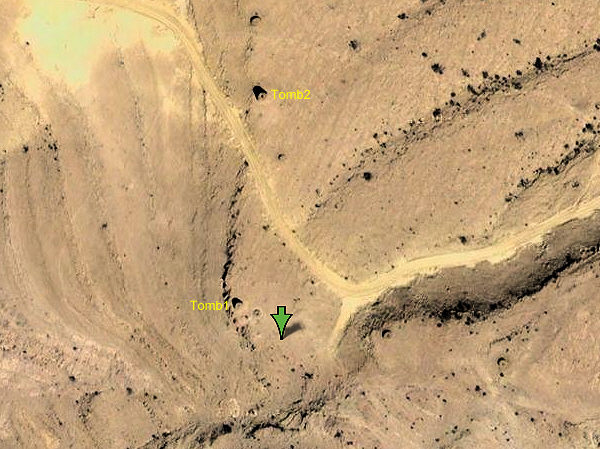
Tombs 1 and 2 on the satellite view are pictured below, respectively:
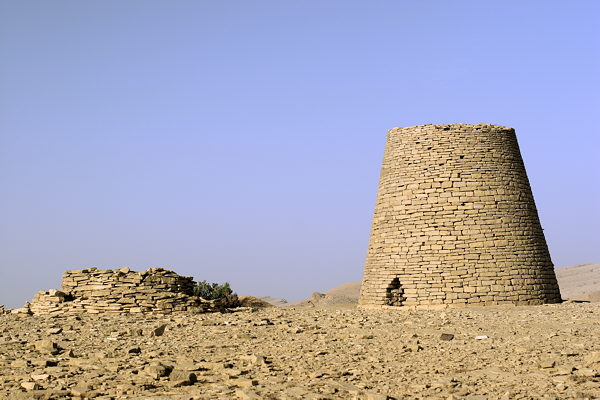
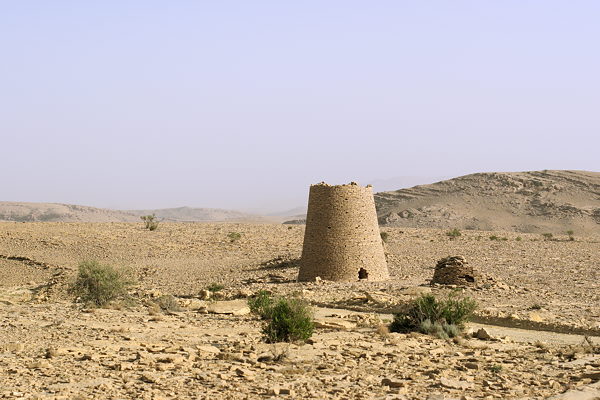
4500 years old and still standing! I do not think many of our present day concrete buildings will survive even a couple of hundred years. You can also explore the area by satellite simply by clicking that earlier satellite view. A new page should open and you can fly around and zoom in/out as desired. The surrounding countryside is very rugged, not easily appreciated from the satellite imagery:
This location is a good one
for astro imaging, elevation 1742m, a reasonable
temperature of 16 deg C by midnight compared to 41 deg C that afternoon at the
nearest town, Ibra, some 70 km away. Despite a lot of
dust from some far off sandstorm that afternoon, the air at this elevation
cleared up enough to produce a very dark sky, measured at Mag
21.6/sq arc-sec on a Unihedron Sky Quality Meter
(Visual Limiting Magnitude 6.5). You could make out M31 as a
faint fuzzy with wings, by naked eye. I set up the Skymemo
and polar aligned it as meticulously as I could. Always a good idea to read the
instructions beforehand! There was a bit of use of averted vision to place that
infamous second star at the appropriate location on the reticle.
I wish they would use a larger aperture for these polar finder scopes so that
the second star would be more easily visible, a deficiency in all the ones I
have used to date, a Celestron, an AstroPhysics and now the Kenko.
The second star is more easily visible at higher latitudes, but with sufficient
care it is indeed possible to place it quite effectively, even in
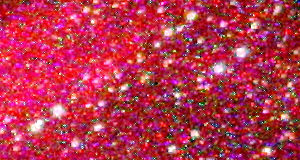
No quibbles at all when using the mount for really wide field and my custom half kilo counterweight. The animation below was shot at 50mm focal length on a Hutech Canon 20D, in fact with no counterweight at all, just the bar. I got the small counterweight fabricated after this field experience demonstrated that the stock 1.5 kg one is far too heavy for use with short lenses.
The Skymemo is indeed most pleasant to use with short lenses. The above is a capture of the numerous nebulae in Cygnus using a Canon EF 50mm/1.4 lens. Framing is straightforward using the Angle Finder C, and the Canon TC-80N3 is easy to program to bang away the many exposures happily. Actually the nebulae do not show up very well in white light imaging with all that rich Milky Way, hence the above is an animation of 21x2min frames at f4 in white light (through a UV/IR cutoff filter) followed by 22x2min frames at f2.8 through an Astronomik UHC filter + the UV/IR cutoff filter. One can blend the two sets towards more nebulosity or more prominent star fields as one desires. The Astronomik+UV/IR Blocker combo passes 2x40nm bands, one covering H-beta and OIII in Blue/Green, the other covering H-alpha and SII in deep Red. No quibbles at all when using short lenses. I could also have shot the frames at much longer than 2 minutes each, but I had decided beforehand that I will shoot everything for 2 minutes at ISO 1600, so as to require only one set of dark frames, with any lens or f-stop. Very nice round stars all over. All the astro images shown here were calibrated with darks, flats and bias.
Long Lenses
When I changed over to the Canon EF 200mm/2.8L II lens I ran into a totally unexpected problem. The Field of View with this lens is equivalent to 320mm on 35mm format, quite narrow. With a 1.4x tele-extender it becomes equivalent to 448mm, requiring even more precise pointing. At a light polluted site it's easy enough to recognize the very few bright stars visible through the viewfinder. At a dark site it becomes equally easy to get confused as to which star you are looking at through the viewfinder, and I ended up spending some hours shooting the wrong star fields. Squirming on the ground is not conducive to accurate aiming, so I used the Angle Finder C, just adding confusion to orientating oneself. For example, I wanted to capture those billowing star clouds in Sagittarius, but ended up in a somewhat bland area. What I really wanted was the area towards the lower right of this image (10x2min at f4, ISO 1600) where there is ample structuration:

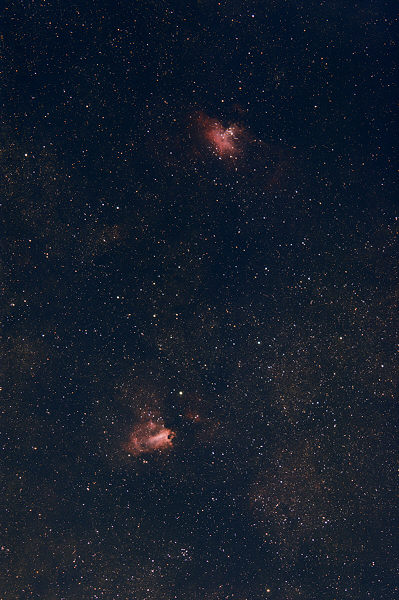
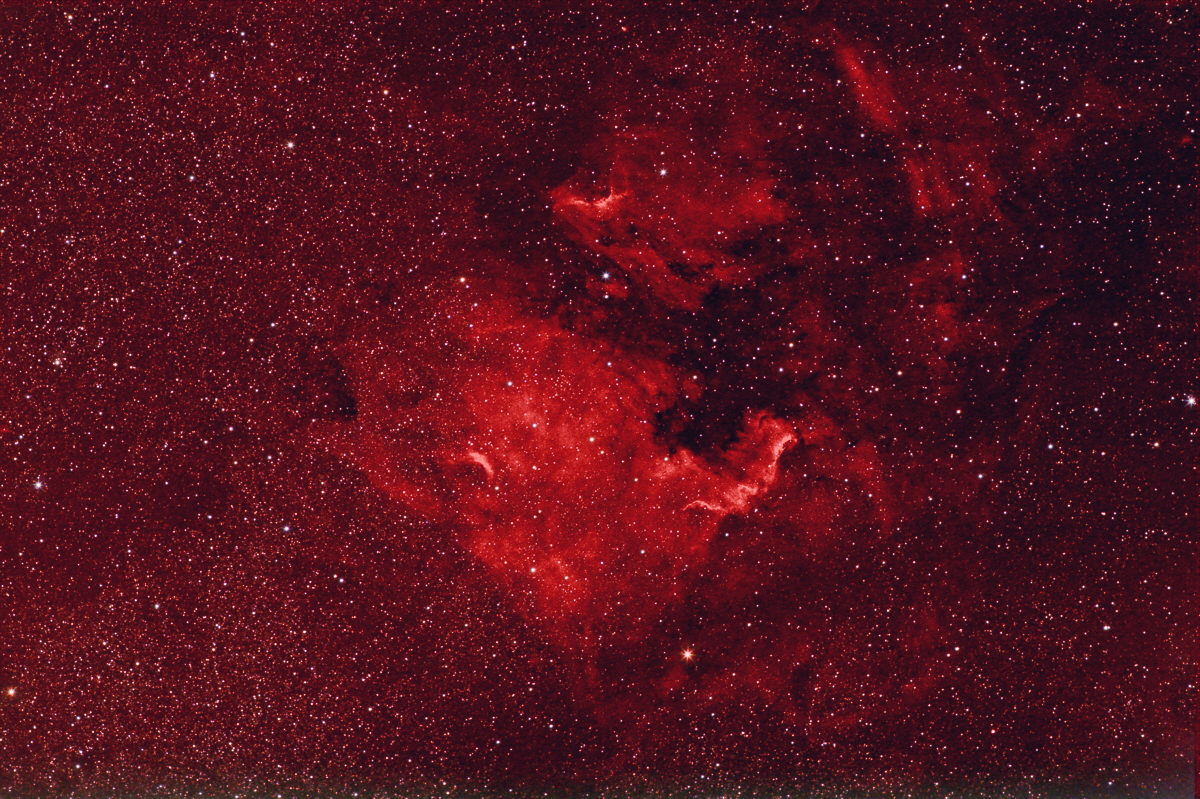
Next attempt was to try to get a quickie on the Lagoon and Trifid (M8 and M20) using a 1.4x tele-extender. By this time I realized that framing at these longer focal lengths was tricky. So I got somebody to point a laser at where I thought the two nebulae were. Took a 2-minute exposure and saw a couple of faint fuzzies on the back-of-camera LCD. Set up the TC-80N3 and banged away. It was only a few days later after I got home that I realized that I had captured the Swan and the Eagle instead (29x2min, with the 1.4x extender giving 280mm focal length at f4)! Curiously, the Lagoon is peeping in at the top right corner of the previous image! Hindsight is so clear.
Well past midnight I wanted to tackle the California Nebula. By then everyone had gone to sleep and there was nobody to point the laser :-( It took over an hour before I was certain that I had framed the culprit as intended. In fact, the only way I got there was to cut back to 200mm and take 2-minute frames at ISO 3200 till I could see some red faint fuzzy. Centered it and then stuck back the tele-extender. Whew! Clicked away till the battery gave up at dawn. Each fully charged camera battery seems to last for a bit over 2-hours' integration time. Here is the final product of that tortuous hunt (56x2min, 280mm f4, ISO 1600):
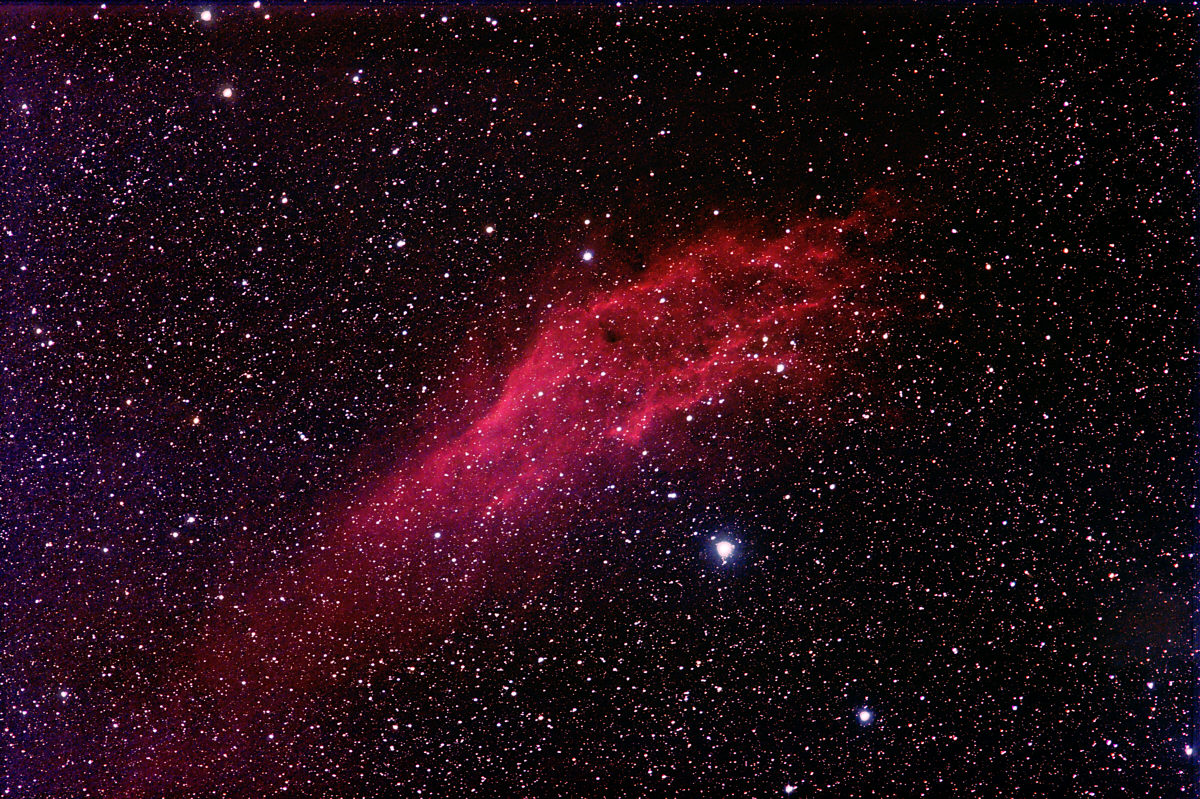
Looks like a giant squid
to me, rather than a map of
But How Well Does the Skymemo Track?
Let us examine this in detail. From the above stack I took two sub-exposures, shot two hours apart, at 0230 and 0430 and added them up. Below is a 100% crop of the summed result, from near the center of the nebula (stretched using Digital Development in ImagesPlus):
In two hours we find that there has been a total drift of just 27 pixels, equal to 0.23 pixels/minute, or 1.1 arc-sec/minute. Quite remarkable, considering that I did not do any drift aligning. Whatever Periodic Error the mount has is too small to matter at these focal lengths. The instruction manual says that you should confirm your polar alignment after the camera has been attached. So I did the initial polar alignment with the camera, but then demounted and remounted the camera several times, with different lenses. I never did reconfirm the polar alignment after each set-up, yet the above results do show that the mount and tripod did a superb job of retaining the initial alignment. Competent tracker, competent tripod. I would even venture to say that improving the polar alignment beyond this by the drift method could be a rather lengthy process. Waiting 10 minutes will produce a tiny drift of only 5 arc-seconds on either the RA or the Dec axis and one is restricted to, say, 100x (likely very much less) magnification using a camera lens with scope eyepieces. Drift aligning looks quite unnecessary for lenses up to 300mm focal length. Can we stretch that statement up to 400mm focal length? Depends on what length sub-exposures one is looking for, and anyway, how many pixels drift can one tolerate before the stars look oval enough to irritate, half a pixel, one, two?
At the above very dark site a 2-minute exposure at f4 puts a nice gap on the histogram between the origin and the trailing edge of the skyfog mountain, i.e. we are already operating in the desired skyfog-statistics-limited regime. No pressing need for longer sub-exposures, just more integration time. But what aperture would we be using with a 400mm lens? The Canon 400mm/2.8 is far too heavy for this mount and the 400mm/4.0 DO may show diffraction spectral patterns on the stars (I suspect, but I do not know). The 300mm/2.8 + 1.4x extender could be a good, fast OTA, at the limit of the Skymemo's load capacity. Without drift aligning we would expect a total drift of less than 0.7 pixels in each 2-minute exposure. This may well yield satisfactorily round stars, and even if the exposure length is cut back to 90 seconds we do not yet run into major issues of having the skyfog statistics being messed up by the camera's Read-Noise. However a more common 400mm focal length lens option is likely to be at f5.6; either the Canon EF 400/5.6L or the 200mm/2.8L + 2x extender. Ideally, for f5.6 we would like to shoot each frame for a minimum of 3- to 4-minutes to retain that gap between the skyfog and the origin. Quite possibly we may have to drift align in order to retain round stars, or use star-rounding software in the post processing. Of course, moving to a less pristine dark site with greater skyfog straightaway allows shorter exposures and still remain in the skyfog-statistics-limited regime (but at the expense of longer total integration time). But then we might wish to use an LPS or an H-alpha filter; and we are yanked back to longer exposures. My overall conclusion? The Skymemo's focal length limit is probably around 400mm, with no drift aligning required if you can lay your hands on an f4 system. With 400mm/5.6 you may or may not get away with no drift aligning, depending on your skyfog, filters employed, etc. One way or the other, this mount should be capable of delivering high quality DSLR imagery at up to 400mm focal length, unguided. 300mm is still relatively straightforward, 400mm is pushing at the limits. On some night in the future I will make a determined attempt at 400mm and report back.
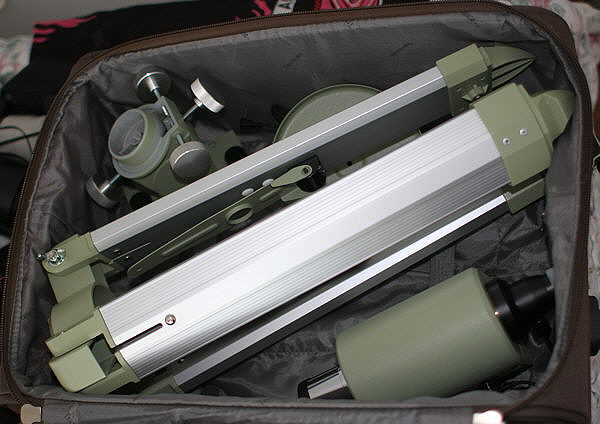
Airline Friendliness
Yes, you can pack the entire mount, tripod and power supply into airline cabin luggage, or your clothes suitcase for that matter. The latter may be more practical since the clothes provide ample cushioning. This is how the stuff fits into airline cabin luggage:
In fact mine has already
traversed the globe. It got first light in a heavily light-polluted
Conclusions
The Kenko Skymemo does what it was designed to do very competently. You can indeed image at focal lengths up to 300mm without bringing along a laptop, without drift aligning, without heavy batteries, without guiding. It also seems feasible to push that up to 400mm, but with an f5.6 lens you may have to do drift aligning to ensure round stars (or use star rounding software in post processing). With the awkwardness of having to sit or squirm on the ground using the compact dedicated tripod I found it surprisingly time consuming to point longer lenses (200mm upwards) accurately. Next time I will tape a laser pointer to the camera so that I can identify the relevant star next to my target object at first go. The 1.5 kg counterweight is often too large and too heavy. A lesser diameter 1 kg counterweight will likely have more universal applicability. At this time (September 2006) the Skymemo, tripod, counterweight bar and the stock 1.5 kg counterweight cost a total of $1173+shipping. There is also a Dec axis motor and controller/autoguider interface available for $495 that I have neither seen nor tested. Somehow it sounds like too much complication for a system that is beautiful in its very simplicity and very high competency. If you own this Dec drive and find it useful enough to recommend it, then please do drop me an email.
And I recommend the Kenko Skymemo for
The
accomplished astro-imager. If you are already a
competent astro-imager who has to travel to dark
sites, then you already know all about the 100kg of kit you have to bring along
each time! It really is very, very pleasant to take along just this little
mount and tripod (10 kg total, including tripod, counterweight and batteries),
a modded DSLR with 3 or 4 of its little batteries and
be confident that you have enough gear to produce superb astro
vistas. Bye-bye to heavy batteries, laptop, autoguider,
etc. But bring along a laser pointer and some tape to stick it onto the camera
if you wish to use lenses of 200mm or longer focal length ;-) It goes without
saying that it is also a wonderful mount to take along on holidays to some
remote village in Andalusia or a beach in
The beginner. Things are a bit more complicated for a beginner. A beginner has not yet realized how much kit he will eventually require to achieve satisfying astro images through a scope, so he starts looking for one of those do-it-all, promises-galore, go-to SCTs and then adds a wedge, and..., and..., and... And finally gives up, sells the whole lot at half price and buys a GEM. Eventually he will also end up with the 100kg of kit to lug around, including the GEM! Here is an alternative. Buy that super-duper, go-to fork-mounted SCT (8" to 11") to satisfy all your visual observing and planetary webcamming needs; but simply ignore it altogether for imaging DSOs. Get the Kenko Skymemo for DSO imaging and start shooting those awesome vistas of the Milky Way. You will soon be producing superb images, the envy of your friends who are still struggling with their wedges, trying to balance piggybacked cameras, whatever.
Added December 2007:
OK, I have finally gotten
around to testing the Skymemo at a 400mm focal
length, with a Canon 400mm/5.6L lens. But this time I was also testing a newly
acquired Canon 40D DSLR, modded by Hutech to have a rectangular passband
UV/IR Blocker over the sensor.
All the
earlier tests employed a modded Canon 20D. The
significance is that the 40D has 10 megapixels over
the same sensor acreage and its pixel pitch is now 5.7 microns, compared to 6.4
microns in the 20D. Consequently we are imposing slightly tougher scrutiny on
both the tracking and the lens. The image below is the Andromeda Galaxy, M31, autofocused on a nearby bright star and shot at f5.6, 36x3min
exposures at ISO 1600 and a temperature of 22deg C, rather warm. I did not
drift align either. But of course, this time I had a laser pointer taped to the
lens hood, so framing was very quick J
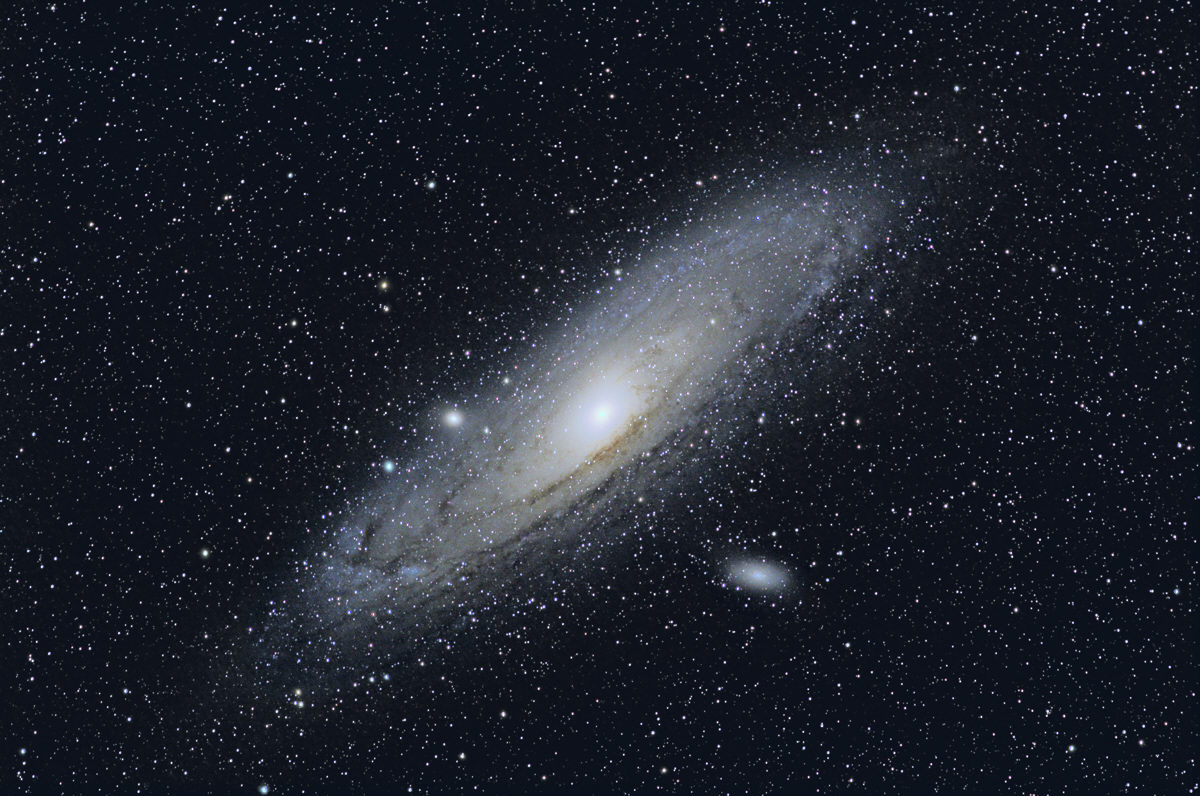
So, as may be seen above,
the Skymemo does track accurately enough for a 400mm
focal length, for web-size presentations anyway. However, its limit has been
reached. When we examine the image at 1:1 we find that the stars are somewhat oblong,
something that may well show up on a large print. Below is a 100% crop of the
smaller galaxy, M110:

Further field use has led me to the following tid-bits. The Skymemo does work well with a pro-quality photo tripod that has a pro-quality video pan&tilt head. Polar alignment is quick, precise, and at a comfortable height. No more squirming on the ground. The camera is also at a comfortable height for making adjustments or examining the back-of-camera LCD. Best tool for framing is a green laser handheld and pointing THROUGH the viewfinder eyepiece. Yes, incredibly, it does work! But of course, the dedicated mini-tripod is a far lighter overall package better suited to air travel.
Some relevant references
Hutech pricing and specifications for the Kenko Skymemo.
How to measure your skyfog and determine minimum length for each sub-exposure, i.e. per frame.
Choosing an astro-competent Canon lens through the use of MTF data.
Struggles Using a Fork-Mount SCT on M42
How to attach a star diagonal and astro eyepieces to your EF lenses
For more stuff return to Samir's Home
To drop me an e-mail just click on: samirkharusi