Rough-Science Spectrograph
Introduction
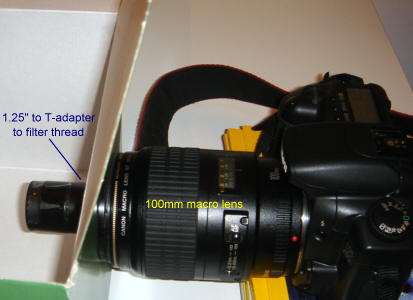
I was ordering a couple of filters from Baader when I noticed that they were also selling a Blazed Grating that can be used to record stellar spectra. It is mounted in a 1.25" eyepiece filter ring and it comes with a T-adapter, etc to enable attaching it to a telescope. So I included it in my order. Of course as soon as I laid my hands on it I wanted to use it to check out the various astronomical filters I own. So below please find my Rough-Science spectrograph. Basically the grating is mounted in front of a macro lens facing a slit. A box is required to keep out extraneous lighting. A DSLR or astro CCD may then be used to record spectra. For repeatability, the relative positions need to be fixed, hence the box helps with this facet. Calibration is fairly easily achieved by using a standard 150W Mercury lamp commonly used in shops and workshops. Here are the two ends of the box, photographed from above:
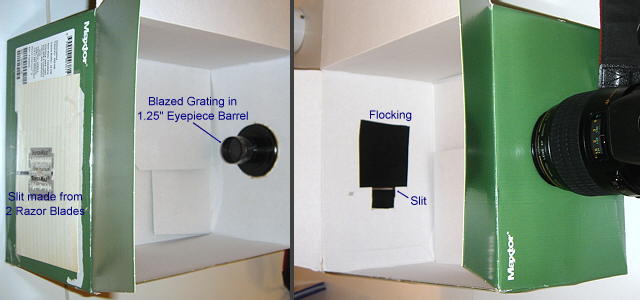
In playing around with the spectrograph one quickly finds out that the slit has to be as fine and as uniform as one can make it. This is conveniently achieved by taping one razor blade onto a card and then spacing out a second blade by use of a third blade to define the gap. Taping down the second blade produces a very thin, uniform slit. It is also easy to hold the grating onto the lens by simply cutting out a cardboard ring to fit. I got my friendly metal banger to make me an adapter ring.
The more you can
immobilize stuff, the more repeatable are your measurements. Actually I was
pleasantly surprised by how this crude contraption is capable of producing
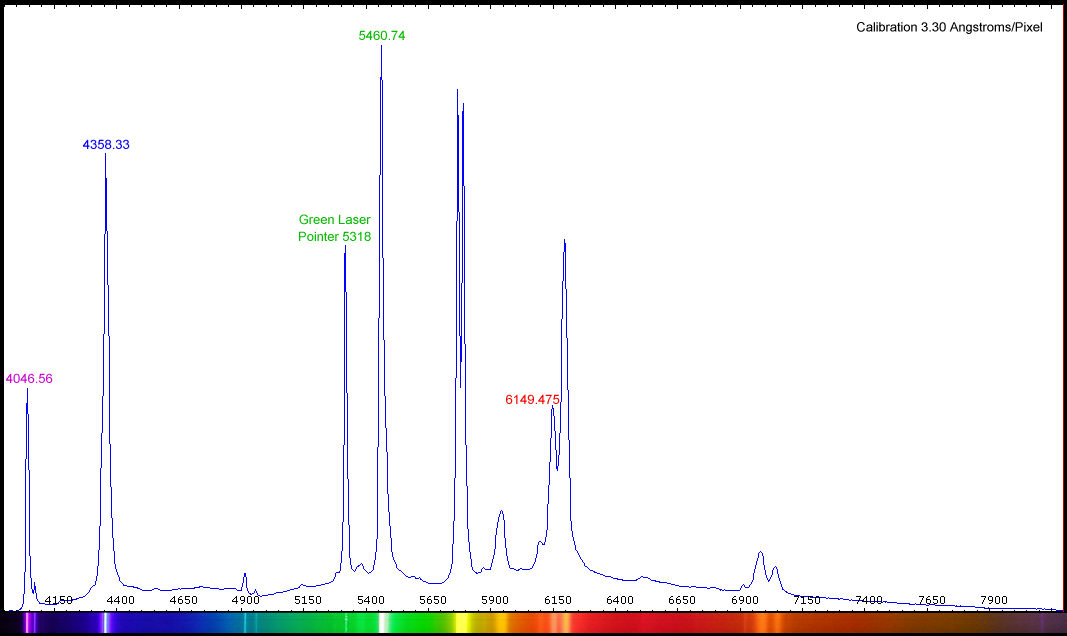
rather precise data. To calibrate the wavelength scale one needs a lamp that
has some narrow lines, widely spaced. I settled on a cheap Mercury 160W bulb
that is commonly used in shops and workshops. This has some easily
identifiable, narrow lines as shown below. It also has many other spectral
lines, extending well into the IR, presumably also from the phosphors, but I
could not be certain as to what wavelengths they are supposed to be, so I could
not use them. Anyway from the four shown below I extracted the wavelength scale
in Angstroms/pixel and worked out that my green laser pointer is at 5318. The
laser pointer is very convenient as a marker line when working with white light
(ordinary tungsten bulbs). You just switch on the laser and you have your
marker line. The best data I managed to obtain from the web on green laser
pointers say that they have a wavelength of 532+-1nm, so at least my measured
531.8nm falls in line. For graphical data one analyses Linear
conversions from Raw files, but the colored strip below is a contrast-stretched
Note that this Canon 20D DSLR has had its UV/IR blocking filter removed, to enhance sensitivity to both H-alpha at 6563A, and the Near IR all the way to 10,000A (for daylight IR photography, using an IR-pass filter such as a Wratten 89B or Hoya R72 to partition wavelengths longer than 7200A). The sensitivities of both human vision and unmodified Canon DSLRs taper to almost nil for wavelengths much longer than 6500A and the need to modify these DSLRs to enhance sensitivity to H-alpha is thus obvious.
Focal Ratio and Shifts in Passband
OK, we have all heard that when you tilt an interference filter the effective thickness of the layers change. I have even heard of a shift towards the blue end. This is supposed to cause noticeable problems when one uses fast focal ratios with very narrow filters. So I decided to do a quickie check to see if this shift is something to worry about when one images using an ever faster focal ratio. Since my blazed grating is in a 1.25" eyepiece filter ring, I cannot open up a 100mm lens beyond, say, f4 (25mm hole). So I built a new Rough-Science Spectrograph using a larger box so that I can use a 50mm lens without complications of having to use extension rings to enable close enough focusing. The 100mm lens yields a spectral dispersion of 3.3 A/Pixel with this grating, but the 50mm lens will yield half the dispersion. Actual spectral resolution of course depends on the resolution of the lens, the dispersion & resolution of the grating, and the resolution of the sensor; whichever is most coarse, roughly speaking. I suspect that with my setup the Canon 100mm/2.8macro USM lens out-resolves the sensor in the 20D (I used it typically at f8) and so the main limitation to spectral resolution would be the sensor pixel pitch and how thin a slit I managed to make. The quality of the grating did not seem to be a limitation. Consequently, if filter pass-bands migrate significantly, say 10 to 20 Angstroms (1 to 2 nm) then the migration should still be easily detectable with the admittedly less sharp Canon 50mm/1.4 lens. I used a Light Pollution Suppression filter in-between the lens and the sensor, a location used in normal astro-imaging. Unfortunately I do not own any narrowband filters that can go inside my camera, and using an astro CCD with Canon EF lenses makes it impossible to ensure data repeatability. To set an f-stop one has to attach the EF lens to a Canon camera, set the desired f-stop and open the shutter on Bulb, remove the lens with the shutter still open. Remounting the lens and astroCCD onto the spectrograph will require a whole new calibration. Rather impractical when one is trying to see the tiny differences with varying aperture settings. We are looking for minute migrations. So here is the filter placement I used, an IDAS LPS-P2 Front Filter, more commonly referred to in DSLR circles as a pop-in filter:

And these are the spectra I got using a 60W tungsten lamp; the optical chain being 60W lamp, slit, 40cm of empty air, grating, Canon EF 50mm/1.4 lens, LPS filter, sensor:

Since we are trying to detect minute migrations in pass-bands I have also included a Green Laser Pointer next to the 60W lamp to calibrate the wavelength scale. Difficult to say whether the pass-bands actually shift noticeably towards the (expected) blue side. This lens is considerably less sharp and has less contrast at f2.8 than when closed down. Is this the cause for the laser line to be less strong, or is it because the passband has shifted towards the blue sufficiently to attenuate the laser beam? Also take a look at the narrow pass-band between 6000 and 6100A. That also seems to migrate less than 10A between f8 and f2.8.
Conclusion? Something to worry about when your filter has a pass-band narrow enough to be talked about in Angstroms, but can be ignored if the pass-band is several nm wide, like most filters used in DSO imaging.
And Anyway, How do Modified and Unmodified DSLRs Record Colours?
Rather obvious and straightforward, ain't it? You know all about the Bayer arrays of R,G,B filters, with G repeated, etc. Well figure this out. I took an ordinary 60 Watt bulb and recorded its spectrum in an unmodified Canon 1Ds, a camera highly regarded for superb colour rendition. I used Daylight White Balance and then Tungsten White Balance. All I was expecting was that the Blue will get a slight boost and the Red attenuated a bit by changing the White Balance. You know, to make a proper white from a brownish warm white. Here are the Luminance distributions of the two spectra:
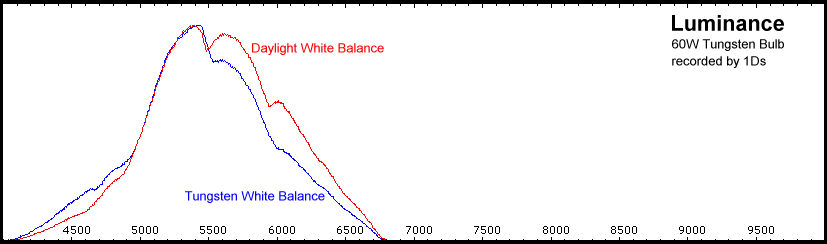
Nicely behaved, as per our expectations. But now let us dig deeper and plot the R pixels separately from the G, and the G separately from the B:
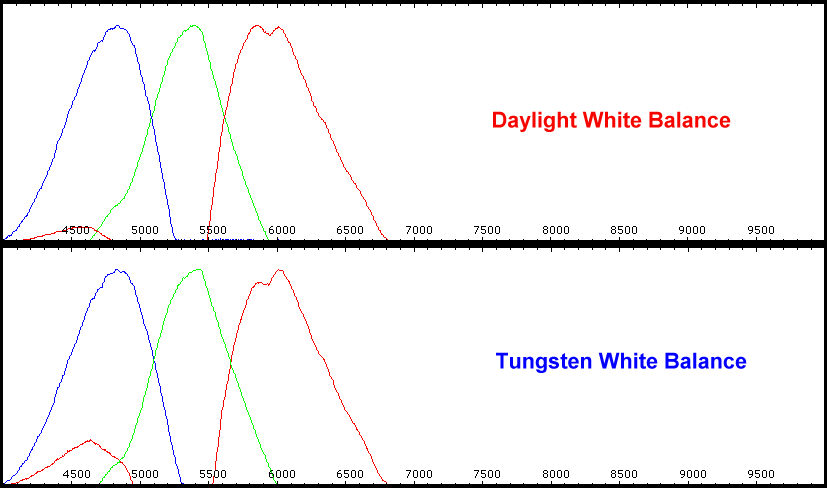
Question to ponder: Why are the Red pixels recording wavelengths in the deep blue, around 4500A?! The Red Bayer filters leak! say the Wise. But then why is this leakage boosted so much when we shift to Tungsten White Balance, apparently much more than any boost in the Blue pixels? I am intrigued; and this is even before I started looking at colour response in my modified 20D. Next we investigate a Hutech-modded Canon 20D. This camera has had its UV/IR Blocker removed and then replaced by clear glass with anti-reflection coatings. Below is the camera response to an ordinary tungsten bulb:
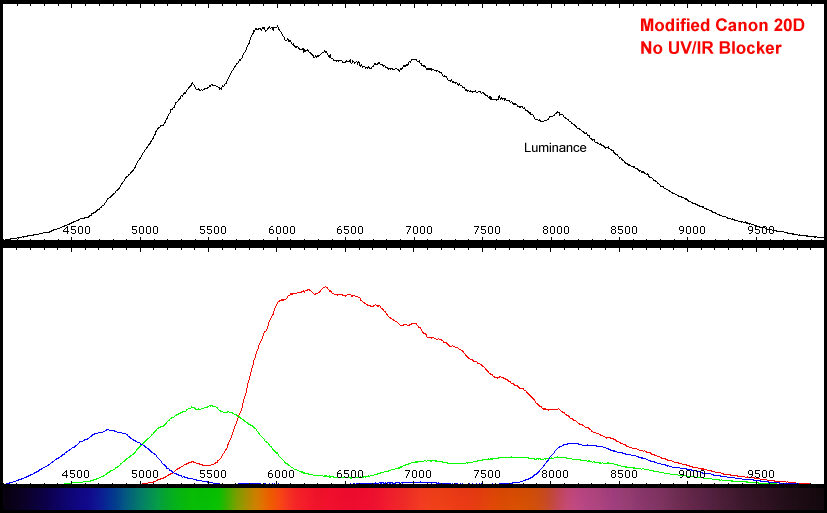
Note the enormously high sensitivity to deep Red! Or alternatively the paucity of Blue and Green in a low Wattage light bulb... Canon does sacrifice a lot of the base sensitivity of their CMOS chips to give you good colour balance. One day somebody will come up with sensors with peak sensitivity at around 5500A (somewhat similar to the human eye) and then we can look forward to routine use of ISO 6400+, rather than be encumbered by the current severe filtration in UV/IR blockers employed by camera manufacturers to shape reluctant sensors into yielding excellent colour rendition. Also note that the modified camera does have oodles of sensitivity to H-alpha at 6563A; nice for all those deep red nebulae :-) As an aside, do note that the H-alpha does leak into the Green pixels in this modded camera; so ignore all those Wise remarks about the Bayer array destroying resolution in H-alpha because only a quarter of the pixels are Red. It does not do that to any significant extent in a modded 20D. Resolution in H-alpha is noticeably lower in an unmodified 1Ds, where H-alpha is both recorded extremely weakly and also does not leak into the Green pixels, see earlier graphs. Another common remark is that refractive optics need to be used with a UV/IR Blocker; true, but the corollary that SCTs also do because of their corrector plates is not true. The corrector plates are very weak "lenses" and in actual usage resolution is not impaired to any noticeable extent. In fact I got sharper images in planetary webcamming with no UV/IR blocker than with. Ditto with trying to image the 6 stars in the Trapezium or the zillions in M13 using the modded 20D. Do your own testing. The IR does allow you to use very short exposures, important in hi-res imaging, and you should not throw it away by blindly following weighty pronouncements by the Wise. I thought you would also be interested to know what colour IR records as, so check out the colour bar above from 7000A to 10,000A.
Ultra Violet/Infra Red Blocking Filters
Let us now use a rectangular-passband UV/IR blocker and see what happens:
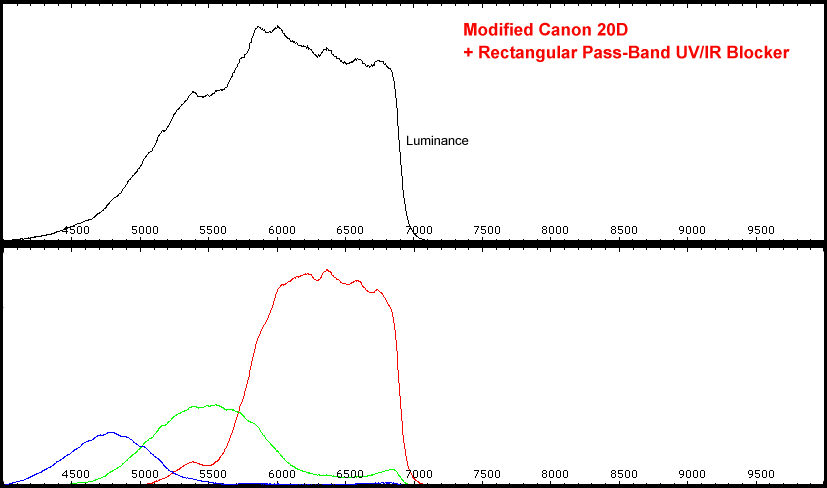
Our great sensitivity to
H-alpha (6563A) is not impaired, but what I find rather amazing is that this
very lop-sided RGB split can still be made to deliver pretty decent colours in normal daytime photography, by the simple
expediency of using the camera's Custom White Balance. The over-abundance of
sensitivity to Red, while very welcome for recording H-alpha emitting nebulae,
might be expected to bring some annoying red halos to stars under extreme
contrast stretching. Something to watch out for, even with
otherwise excellent lenses and
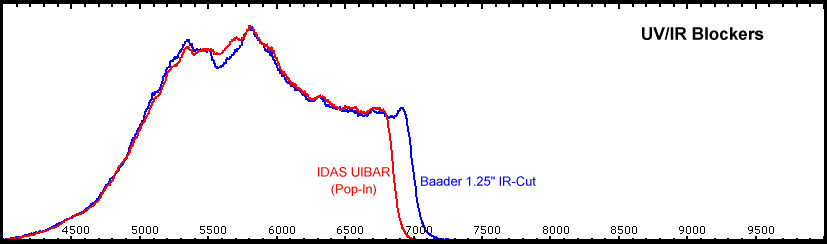
I bought the 1.25" Baader filter to use in webcamming the planets. I must confess, however, that I did not find that it improved my C14 planetary images. Basically there is a slight colour difference between the images with and without the IR-Cut filter, but I always reset the White Balance in the post-processing anyway. Resolution seems to come out ever so slightly better with no filter. This could be because either the seeing is better in IR, or because I can use shorter exposures and/or higher frame rates when IR is included, or whatever. Consequently I no longer use an IR-Cut filter in my planetary webcamming.
Deep sky images with short focal length camera lenses (< 100mm focal length) require that my lenses be closed down substantially, e.g. the Canon 50mm/1.4 needs closing down to f4 (the 28mm/1.8 to f5.6) if I am aiming for prints, rather than just web presentations. I was looking for a solution that would allow me to use these lenses at one f-stop wider apertures and still achieve similar quality star images. Their common problem is that you get blue halos around the stars, even on-axis. So I got me a Baader Fringe Killer:
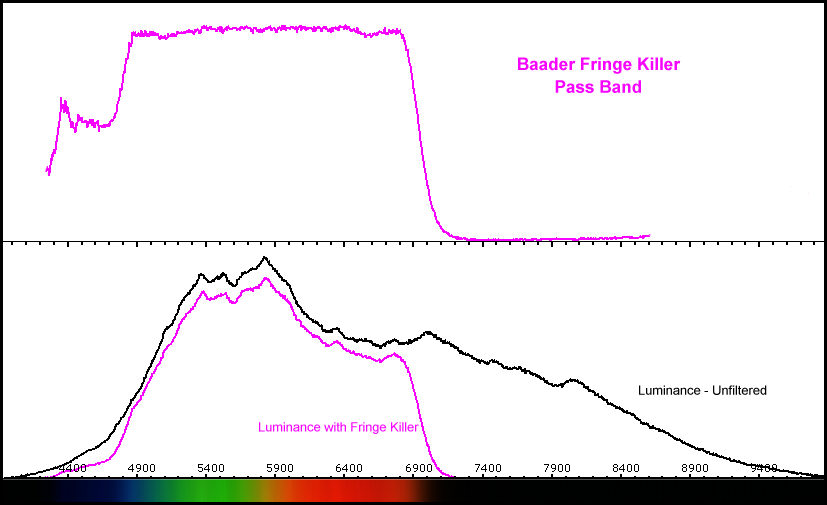
The specific advertised advantages of this filter are that the White Balance is left satisfactory (important for visual observing but relatively unimportant for imaging) through the employment of a ledge on the shorter wavelength end. By dividing the spectral curves above it is possible to get a good idea of the passband of the filter. The ledge is indeed gratifyingly present. Unfortunately this filter has not enabled me to use a faster f-stop with my short focal length camera lenses. The blue halos are hardly affected. Perhaps others have more fruitful results for visual use in achro OTAs.
IR-Pass Filters
I have owned a Hoya R72 for IR daytime photography for many years, but the awkwardness of having to use multi-second exposures in broad daylight in unmodded DSLRs sort of put a damper on my enthusiasm for chasing that special look of IR landscapes. However, shooting IR with the modded Canon 20D changes the rules instantly. The sensitivity of the camera in IR becomes so high that you can, for all practical purposes, use similar ISO, shutter speeds and f-stops as for normal photography. Telephoto shots of birds-in-flight, with full autofocus function, suddenly become feasible. The Hoya R72 is supposed to have a cut-off at around 7200A, hence the "72", but since this is a glass filter, you need several filters to be able to use all your lenses. So I looked around for a more universal solution, a Wratten 89B gel filter, cut down with scissors so that it becomes usable as a pop-in. Great! Now the same filter may be used with all my lenses, from a 14mm ultra-wide to a C14. Below is a comparison of the R72 to the 89B:

Quite similar pass-bands, yielding very similar results.
Light Pollution Suppression Filters
These aim to block the
strong spectral lines emanating from Sodium (low pressure) and
An interesting aside is
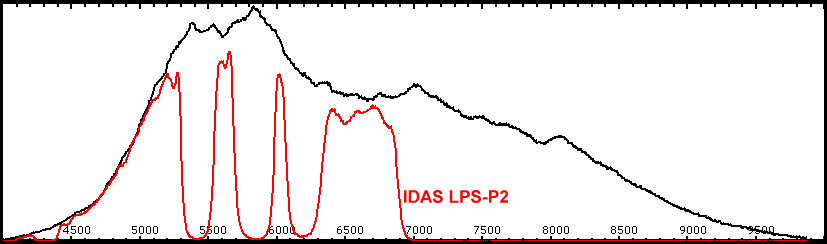
that the LPS-P2 is also very effective as an IR-cut filter. Consequently it
does not need to be used in conjunction with a UV/IR Blocker. Reportedly, it
may even be used with modded DSLRs
to provide reasonable colour rendition in daytime
photography, in lieu of a UV/IR Blocker. Nevertheless if one suffers even worse
light pollution from high pressure Sodium, or even continuous-spectrum tungsten
lights, then more selective pass-bands are desirable. Duo-tone filters enable free
transmission of a Blue/Green pass-band around H-beta and O III, and a Red band
around H-alpha and
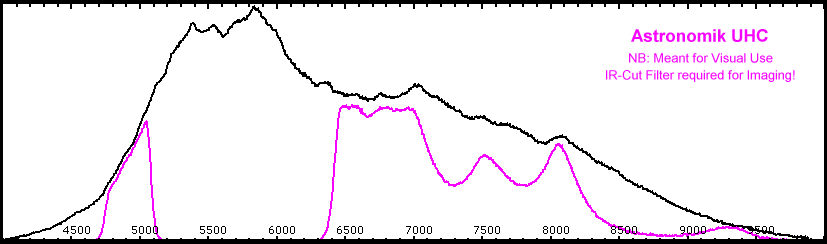
The Astronomik UHC is advertised as a filter for visual observing and in such usage its liberal transmission of IR is of no consequence. Nevertheless, when combined with an IR-Cut filter it does become a very nice duo-tone filter suitable for imaging under much more severe light pollution than the IDAS LPS-P2. It also ends up with narrower pass-bands than the somewhat similar IDAS LPS-V3. When we combine the Astronomik UHC with a UV/IR blocker we get quite an appealing duo-tone filter:
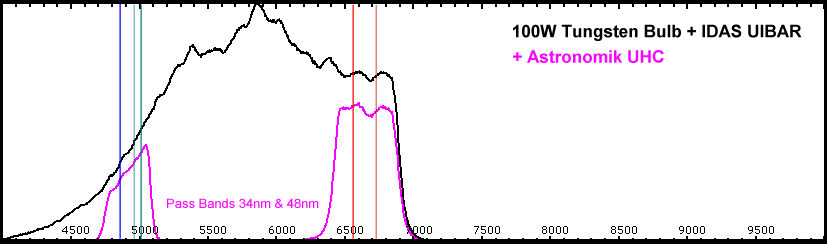
Basically we end up two pass-bands; a 34nm-wide band transmitting H-beta
and the O III doublet in Blue/Green, and a 48nm band in Red that passes H-alpha
and
Narrowband Filters
Filters passing individual
emission lines are considerably less attractive than the previous duo-tone type
for use with one-shot colour cameras, like DSLRs, for the simple reason that one has to capture each
line with its own series of sub-exposures. The multi-colored Bayer array
becomes an impediment, cutting down quantum efficiency, rather than a boost to
productivity. Nevertheless there is a role for narrowband filters even with DSLRs. Sometimes the light pollution is just way too much,
and at other times one may wish to accentuate nebulosity in otherwise
white-light images at a dark site. My narrow filters come from Astronomik and Baader, both in
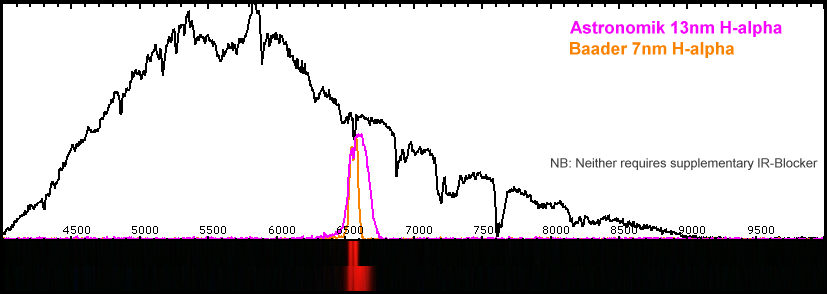
Reason why I used sunlight is that its spectrum is self-calibrating. It has prominent notches at H-beta and H-alpha (amongst many others). Consequently it is easy to ascertain how well centered are the pass bands. Both my samples of the Astronomik and the Baader have H-alpha located near or at their peak transmissions. Gratifying. I also checked out my 8nm Baader O III:
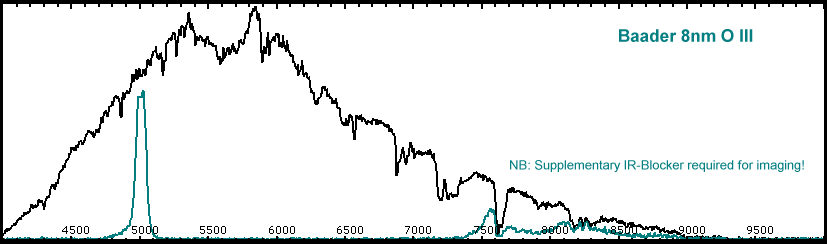
Important! This filter has to be used in conjunction with an IR-cut filter when imaging. Just like the Astronomik UHC, it was probably intended for visual use, wherein liberal transmission of IR has no negative connotations on observing. Next I wanted to get a feel of how much percentage transmission one gets with these filters, so it is necessary to establish repeatability of the data gathering. Consequently I took spectra repeating alternatively with and without each filter and plotted up all the results. One may then be able to gauge how much noise one is getting in the very fickle intensity data. The O III filter was used in conjunction with an IDAS UV/IR Blocker:

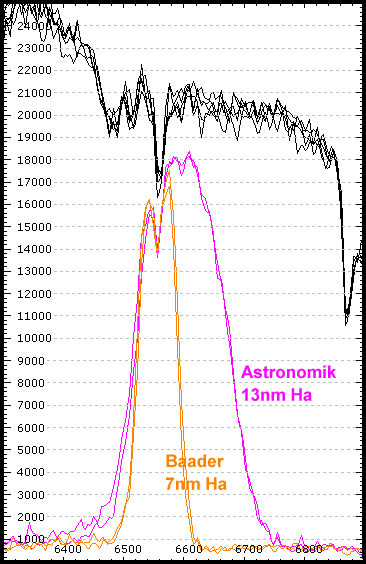
Wavelength calibration for the O III used the solar notches at 4861 and 5173A, hence there is a high degree of confidence that the filter pass-band is indeed centered, as indicated above, on the supposedly brighter line of the doublet, i.e. at 5007A. Apparently it is common practice to sacrifice transmission of the supposedly weaker line at 4959A. Transmission at 501nm looks like 85% (or better) and FWHM is just under 8.5nm. Similarly the FWHM pass-band of the Baader H-alpha filter measures out at 7nm, as advertised, and transmission is 83% (or better). The Astronomik filter is both slightly off-centered and has a FWHM pass-band of 16nm, slightly wider than its nominal value. Nevertheless its transmission at H-alpha is quite healthy. I am a bit reticent at quoting these transmission percentages, since intensities are particularly prone to even very slight, pixel-sized, nudges in the spectrograph when swapping filters in and out. With a bit of inattention one can even get transmission higher than 100%! That's why I am including the "or better". Ideally one should use collimated light to reduce this kind of cantankerousness; but hey, this is Rough Science :-)
Added in December 2008:
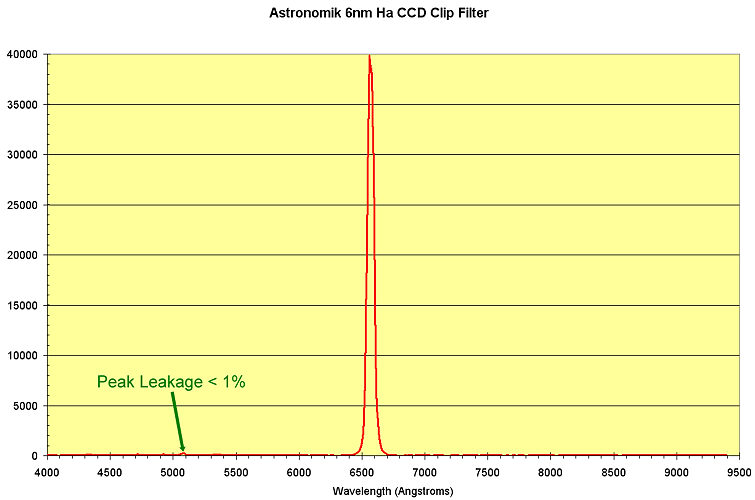
Late summer I acquired an Astronomik 6nm H-alpha CCD "clip" filter for my Canon DSLRs. Since the "clip" version goes inside the cameras, behind the lenses, like for the Hutech pop-in "Front Filters", it should enable me to use all my lenses without effectively stopping them down by sticking, e.g. a 2" filter infront of a 200mm or 400mm telephoto lens. The version I got was certified for better than 90% transmission at Ha, so I expected excellent centration on that wavelength, and a solar spectrogram confirmed it. The FWHM passband is indeed 6nm, as seen below:
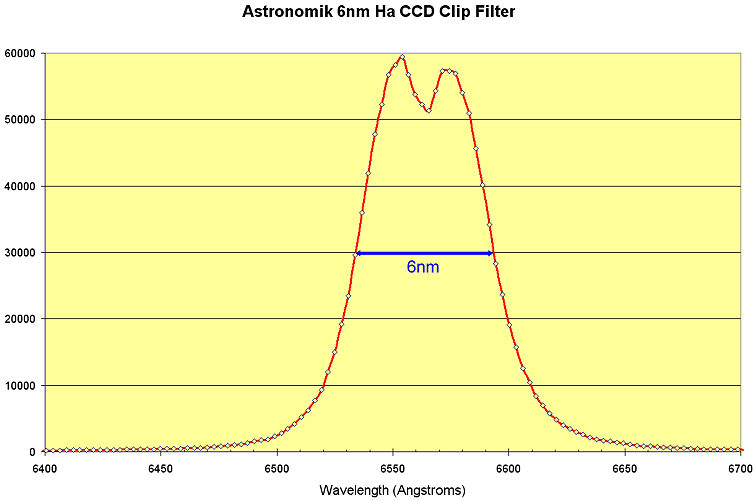
Because this spectroscope is so handy, I happened to point it at a tungsten lamp with clear glass, and I noticed that I could see the filament in the spectrum, weakly, also in Green. Consequently, I examined its spectrograph more closely, looking for leaks. Indeed, this filter does leak slightly at around 510nm, but I am happy to report that the peak leakage is < 1% of the transmission at Ha, much of it even < 0.5%. E.g. in normal room lighting one can point a 25mW Green Laser (532nm) through it and see a spot on the wall. No spot was visible when the same laser was pointed through the Baader 7nm Ha. IMHO the very weak leakage in Green is a total non-issue in taking pretty pictures, but one ought to be aware of it if one is somehow chasing accurate flux measurements, or whatever. I also show the actual data points (per pixel) in the above graph, so that one may better appreciate the available dispersion and resolution of this Rough-Science Spectrograph. The very weak leakage in Green can also perhaps be better appreciated in a graph:
Conclusions
The Baader Blazed Grating works really well with a DSLR. You get most of the diffracted light into the first order spectrum, with no overlaps of higher orders, at a nice scale in Angstroms/pixel. The large sensor in a DSLR enables the capture of the entire spectrum from below 4000 to 10,000A in one go, at a very convenient 3.3A/pixel with a 100mm focal length lens, on a Canon 20D. With newer DSLRs that have ever finer pixel pitches, the dispersion should be even better, e.g. around 2.4A/pixel in a Canon 50D. If needed, one can also try a 200mm lens to yield twice the spectral dispersion.
The Baader narrow filters deliver what they promise, but note that the O III has to be used with an IR-cut filter for imaging. I believe that they now sell an "OIII CCD" version that does not require supplementary blocking of the IR. The Astronomik UHC, in conjunction with an IR-cut filter, makes a good duo-tone filter for imaging emission nebulae at heavily light-polluted sites using one-shot colour cameras. In actual use I found the Astronomik H-alpha 13nm filter too wide for the level of skyfog at my home base. In the current market I would advise anyone to go for a narrower filter, be it from Astronomik or Baader. For use inside the Canon DSLRs it seems that Astronomik has, currently, no competition. In field use I found it excellent, no detectable ghosting of bright stars.
We often purchase rather expensive astronomical filters hoping for magical solutions. Unfortunately, loud chatter in web forums does not always pan out. In particular, I found that I do not need a UV/IR Blocker on my SCT to avoid star bloat from the IR, the Baader Fringe Killer did not improve on the blue star-halos in my imaging with short focal length lenses, my planetary webcamming with a C14 provided sharper images without cutting the IR, etc. Finding out is all part of the game...
Some Relevant References
Visual Spec: Freeware for analyzing spectra
High Resolution Solar Spectrum
Imaging M42 using various filters to battle light pollution
Hutech modified DSLRs and pop-in Front Filters (between mirror box and lens)
Narrowband filters by Astronomik, Baader (also via Alpine Astronomical), Astrodon, Custom Scientific
For more stuff return to Samir's Home
To drop me an e-mail just click on:
samirkharusi